This tutorial will show you how to manage orders within the Virtuemart v2 administration system on your Joomla website.
This tutorial assumes you have logged in to your main Joomla backend Administrator system and accessed the Virtuemart Shop Control Panel.
The Orders section contains details of all purchases made through your Virtuemart shop.
Accessing the Orders List
Access the orders list either by clicking on the 'Orders' icon, as shown in the image below or by clicking Orders & Shoppers menu then Orders option in the panel to the left of the main area.
![]()
You will then be presented with the list of current orders within your shop as shown in the image below.
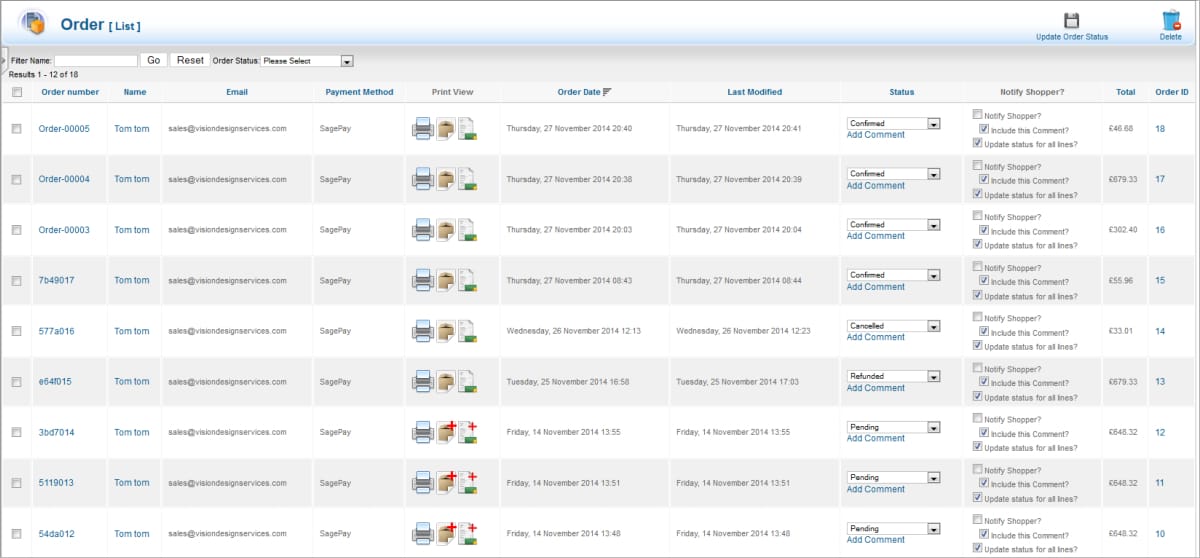
The orders list is structured, from left to right, as follows:
- Above the main list is a filter which can be used to display only those orders for a specific status or by the keywords you enter. This can be useful in a shop with a long list of orders.
- Checkboxes: These are used to select one or more orders to action using options in the menu located above the list. The menu is explained in more detail below.
- The order number.
- The customer name.
- The customer's email address.
- The payment channel.
- Three icons for producing documents. This is explained in more detail below.
- Order Date.
- Last date on which the order was modified. This is normally updated by changes to the status of an order.
- Status. This is a drop down list of statuses for the order. This is explained in more detail below.
- Notify Shopper: Whether or not to auto update the shopper when the status of the order changes. This can be useful for letting the customer know when the product has been dispatched for delivery.
- Total value of order.
- Order ID: This is a sequential number assigned to each order.
Above the main list is a menu of options as follows:
- Update Order Status. If you change the status of one or more orders in the list, you need to click this option to commit the changes to the database and issue emails to the customer(s).
- Delete: Delete selected order(s) from Virtuemart.
By selecting checkboxes next to one or more orders it is possible to use the menu options to modify a number of orders at the same time.
Order Documents
The Print View column displays three icons for each order listed, see image below.
![]()
The icons create the following documents, from left to right:
- Print Order: This can be useful as a reference for picking the items contained in the order from stock.
- Delivery Note: A simpler document containing key order information and a list of purchased items without pricing information. Clicking the icon will generate a pdf which is then placed in your designated downloads folder. You can then print the delivery note and move it to a permanent storage location for future reference.
- Invoice: This is a complete listing of the order containing all information including a unique Invoice number for the order. Clicking the icon will generate a pdf which is then placed in your designated downloads folder. You can then print the invoice and move it to a permanent storage location for future reference.
Order Status
The order status is an essential function within your orders list since it enables you to set a status for the current order state. The important options are:
- Pending: An order is pending if a customer did not successfully make payment, perhaps by quitting the payment stage at checkout. Having this status means you can email the customer to ask if there is anything you can do to help them complete their order.
- Confirmed: This is the status applied to an order for which a successful payment has been processed. This status is automatically set on return from your payment gateway.
- Cancelled: This status is set if the customer clicks the cancel button during the payment stage of checkout. This will be automatically set on return from your payment gateway.
- Refunded: This status is applied manually by you in the event that a customer returns an item, or, calls to cancel an order before it has been dispatched. Setting this status will not necessarily initiate the refund at your payment gateway since it depends on the type of payment integration within your particular shop. You may need to access your payment gateway and initiate the transfer there.
- Shipped: This status is manually applied by you when an order has been dispatched for delivery.
Using the status column can help you manage orders effectively. Statuses such as Pending and Cancelled can help you be proactive in seeking customer feedback which could help identify points for improvement within the shop.
Return to Virtuemart Shop Control Panel
You can return to the Virtuemart Shop Control Panel at any time by left-clicking the Virtuemart badge shown top of the left menu as in the image below.

Return to Joomla Administrator Control Panel
You can return to the main administrator control panel by left-clicking the white icon displayed top left of the Joomla window.
![]()
This concludes the tutorial: Processing Orders in Virtuemart 2