This tutorial will show you how to access the primary menu of a Joomla website and modify it's structure through adding, reordering and deleting menu items.
The menu system in a Joomla website is feature rich, however, this can make it seem confusing when first used. In reality the majority of websites built using Joomla will make use of three main menu types, unless a menu system has been installed to provide required functions.
The three main menu types are:
- Single Article: A menu item linking to a single article, aka page, of content.
- Article Category: A menu item linking to a layout containing articles within a specified category.
- Featured Articles: A menu item linking to a layout containing articles, flagged as 'Featured', from one or more specified categories.
How to Access A Menu
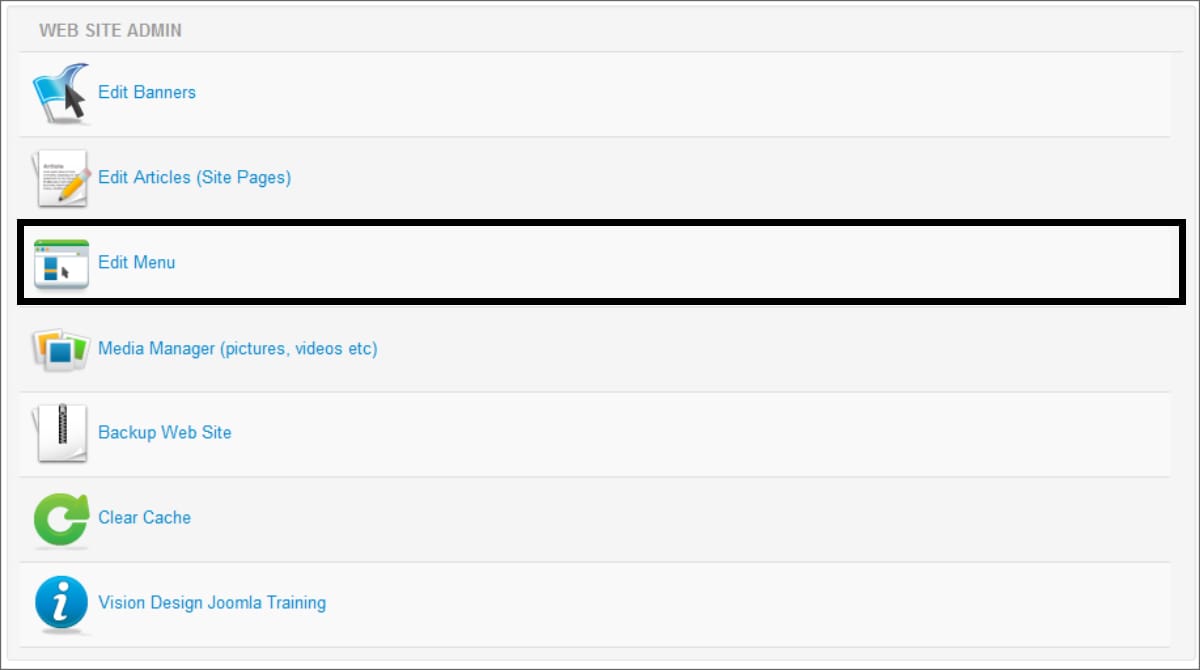
Access the primary menu items list by selecting the Edit Menu icon in the Web Site Admin panel, or, by opening the Menus menu top of the Joomla administrator home page and selecting the primary menu name. Often this is 'Main Menu'. You may also have secondary menus, such as Footer Menu and these can be accessed the same way.
The Menu Manager View
This will display the current menu structure as in the following example.
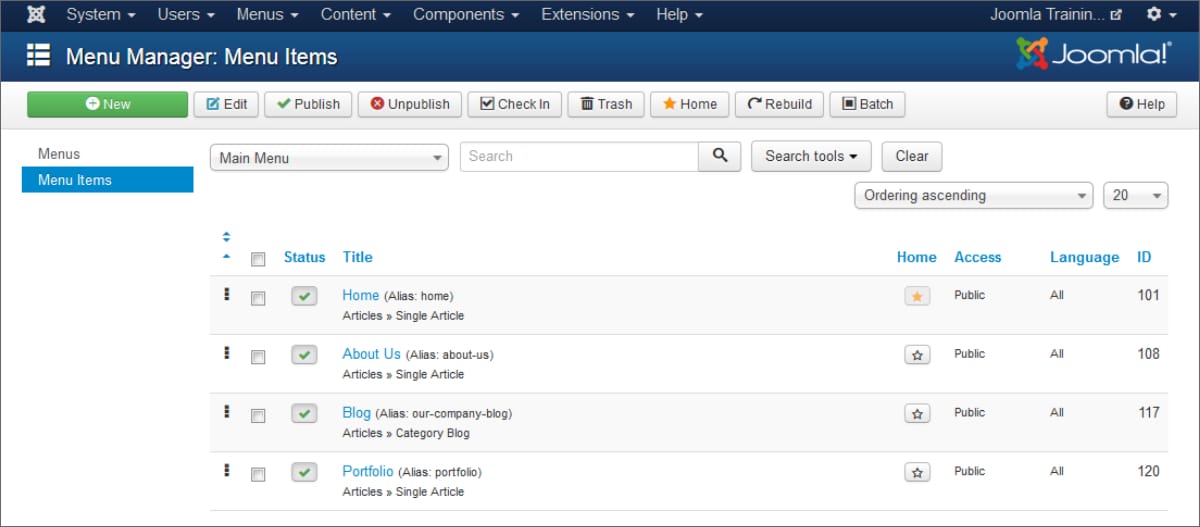
Top of the view is a button bank with the following options:
- New: Create a new menu item.
- Edit: Edit an existing menu item.
- Publish: Change the status of a menu item to published (make it active in the menu).
- Unpublished: Change the status of a menu item to unpublished (make it inactive in the menu).
- Check-In: If a menu item is being edited and the changes are not saved or cancelled, the item becomes locked. This option enables the status of the item to be unlocked or checked-in so that another person can edit.
- Trash: Delete the selected menu items.
- Home: Mark the selected menu item as the home link used whenever the website url is entered or the menu home link is selected.
- Rebuild: Clear the current database entries for the menu and rebuild them using the structure defined within the menu manager.
- Batch: Batch process multiple selected menu items.
Left of the screen , are two options:
- Menus: Selecting this will display a list of all menus within the website.
- Menu Items: The list of menu items in the currently selected menu.
Right of these:
- Menu Selector: A dropdown menu which can be used to quickly move been the item lists of configured menus.
- Search: There is a quick search function which can be useful if the list of menu items is extensive.
- Search Tools: This button enables additional filters for the search as shown in the following example.
Below these is the main menu items list and this displays the following from left to right:
- Reordering icon: This small icon, three square dots vertically aligned, is used to rearrange menu items using drag and drop. The process is explained in more detail later in this tutorial.
- Checkbox: This small white square can be checked and unchecked to mark a menu item. This can be useful in processing multiple menu items at once, for example to delete them, or move them to another menu.
- Status: Published (green tick) or Unpublished (red 'x' icon). Left clicking this toggles the status.
- Title: The menu item name with the menu item type displayed below.
- Home: A marker indicating the home page for the website. "There can be only one" - apologies; couldn't resist the Highlander quote :)
- Access: Normally public for all website visitors but if there are items restricted to registered users this will be displayed instead.
- Language: Normally All as shown.
- ID: An internal reference given to the item by the Joomla system.
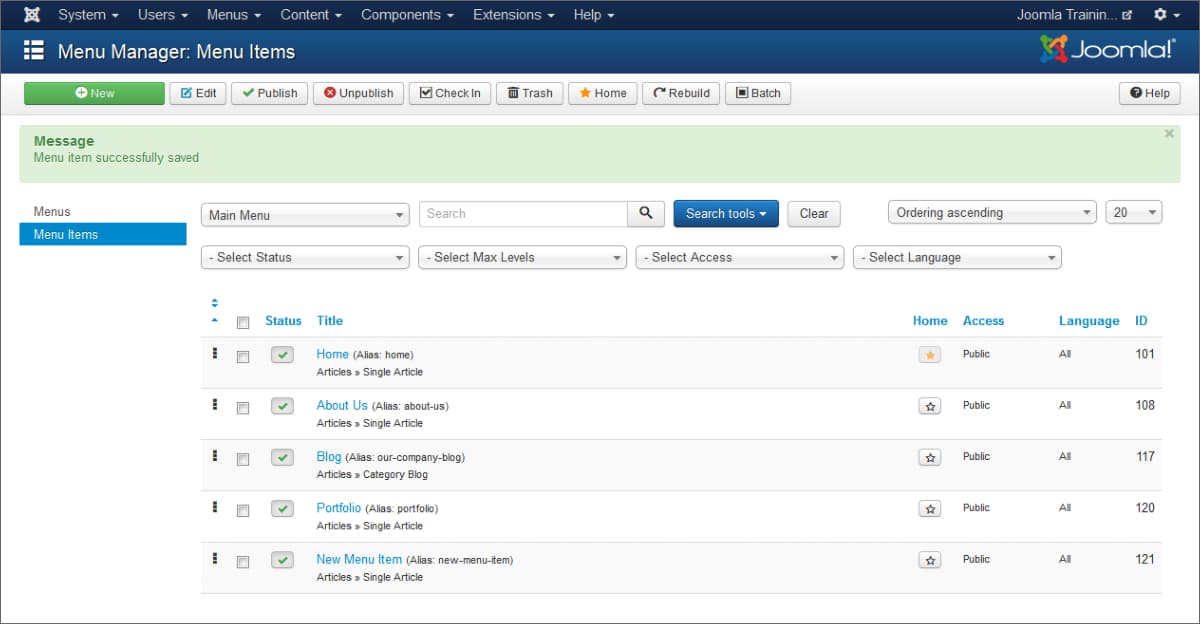
1. Add a New Menu Item
Left-click the 'New' button to open the new menu item view.
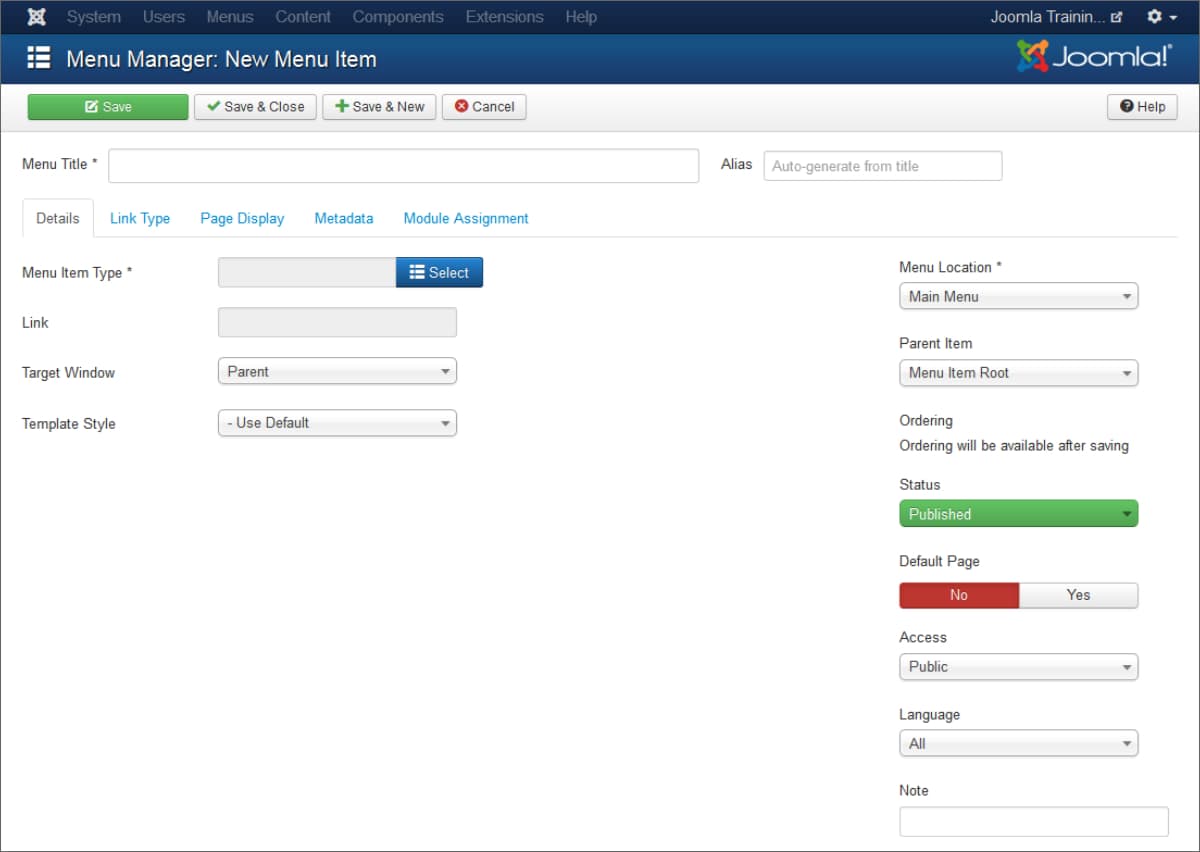
The above is the normal view of the menu item editor which is the same when editing an existing menu item. Below is a version with numbered sections relating to the information which follows.
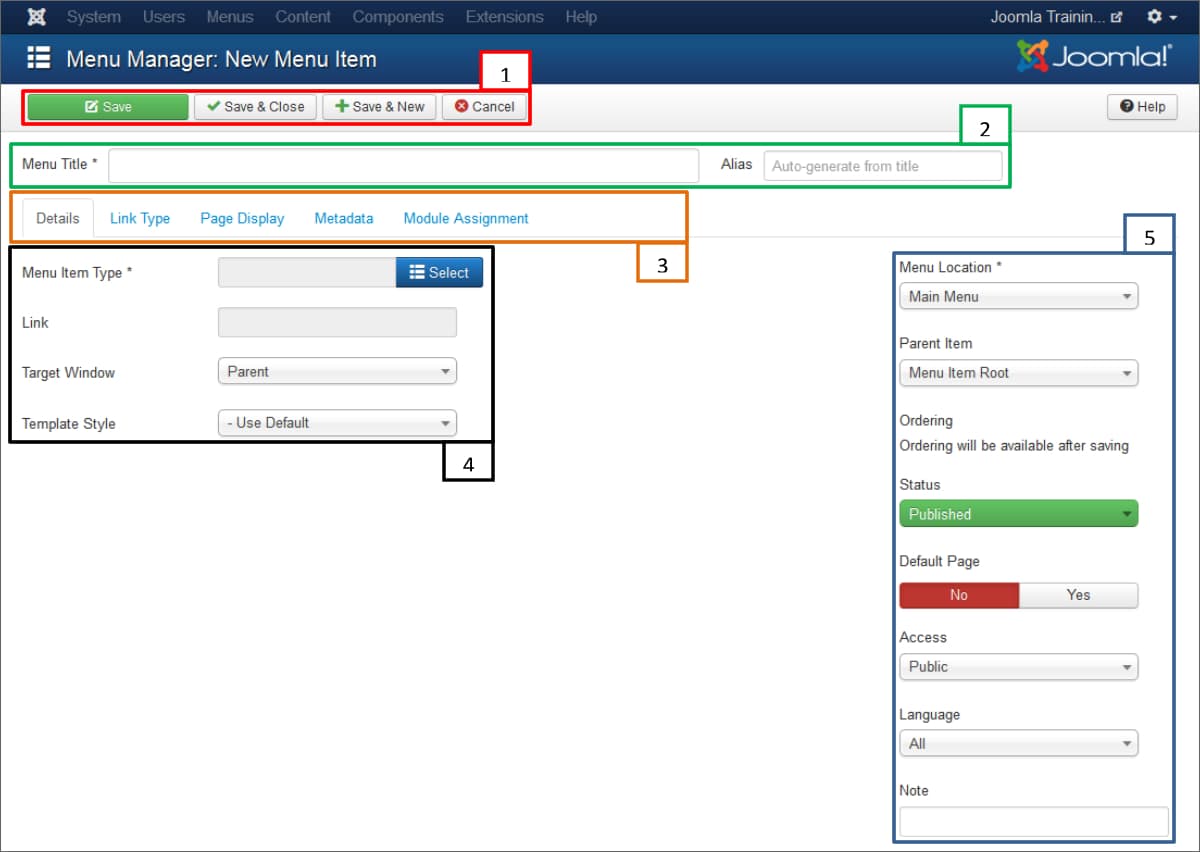
The page can broken down into the following areas.
- Article buttons: used to save, close and create a new item without first returning to the menu items view.
- Title and Alias: The title is the text to display on the menu link. The alias enables a more descriptive text to be entered for search engines.
- Tabs: These contain various options for the menu item.
- The main menu item type selector. More information relating to this element is detailed below.
- Additional menu item options. There are two additional options to note in this area:
- Parent Item: If the new menu item is to appear as a child of another item, for example in a dropdown, select the parent menu item from this list.
- Status: This is either published or unpublished. If items are being added in advance of the intended publish date this can be used to ensure they are not displayed until required.
Enter a title for your menu item. This will appear as the text on the menu when viewed from the front end. It is also possible to enter a more descriptive alias to support the title; if left empty, Joomla will auto populate this field with the title.
Next choose the type of menu item type to be created. Left click the select button to open the following dialogue.
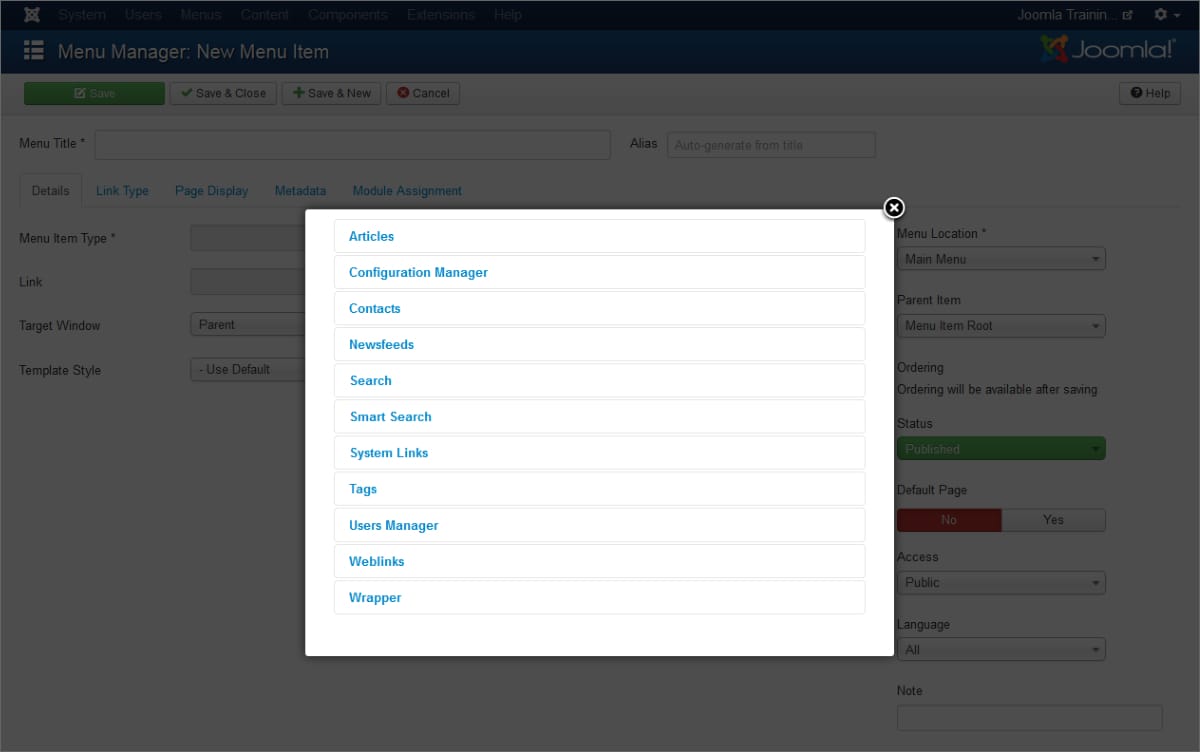
There are many options, the reason Joomla menu management can at first seem complex, but the one used during this tutorial is 'Articles'. Left-click this option to open the sliding panel containing options.
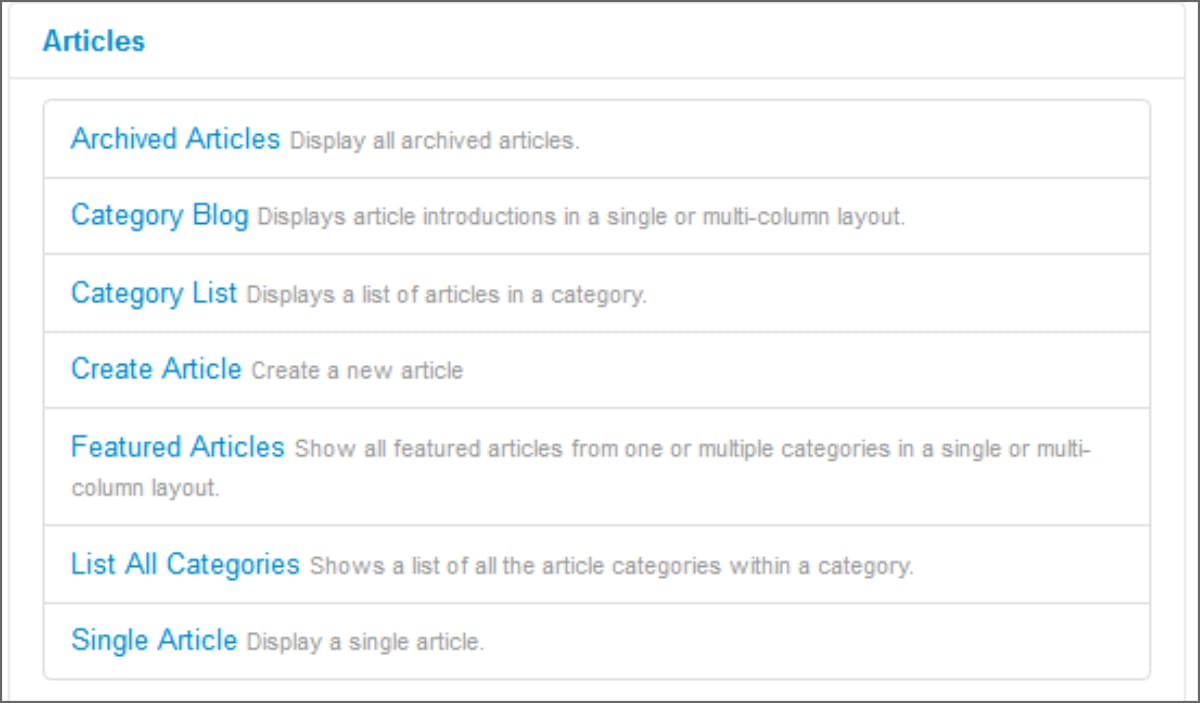
The three options mentioned start of this tutorial are available in this panel.
1.1 Single Article
Selecting 'Single Article' will close the dialogue and return to the main editor window where the 'Menu Item Type' will be set to Single Article.
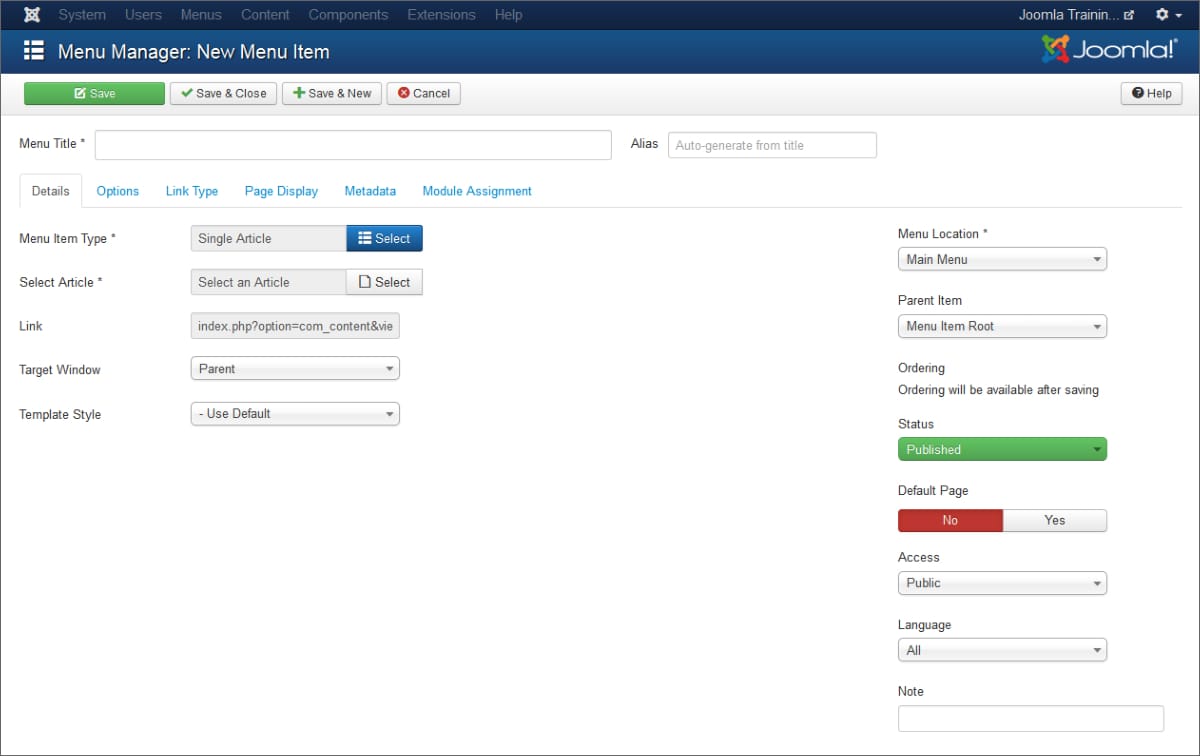
The option below will now read 'Select Article'. Left click the select button to open a list of all articles within the Joomla website, locate the required article and add it.
1.2 Category Blog
Selecting 'Category Blog' will close the dialogue and return to the main editor window where the 'Menu Item Type' will be set to Category Blog.
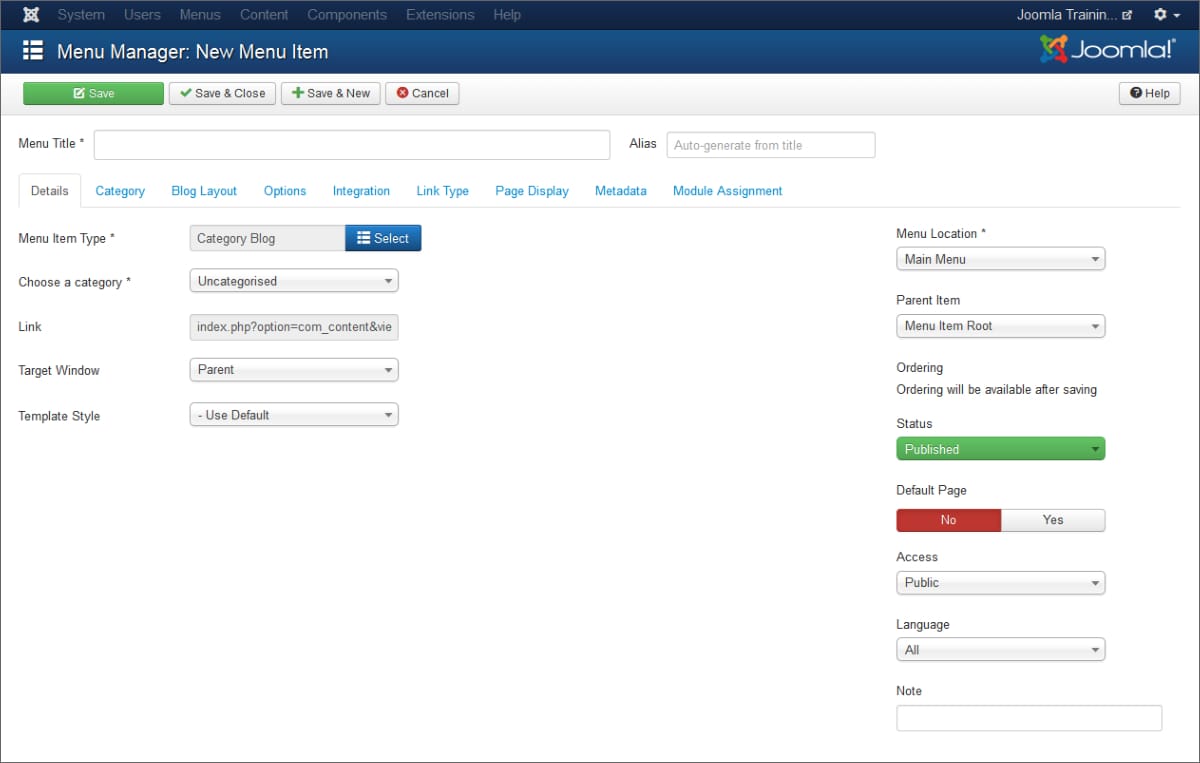
The option below will now read Choose a category'. Left click the drop down and choose the category to be assigned to this menu item.
Next access the Blog Layout tab.
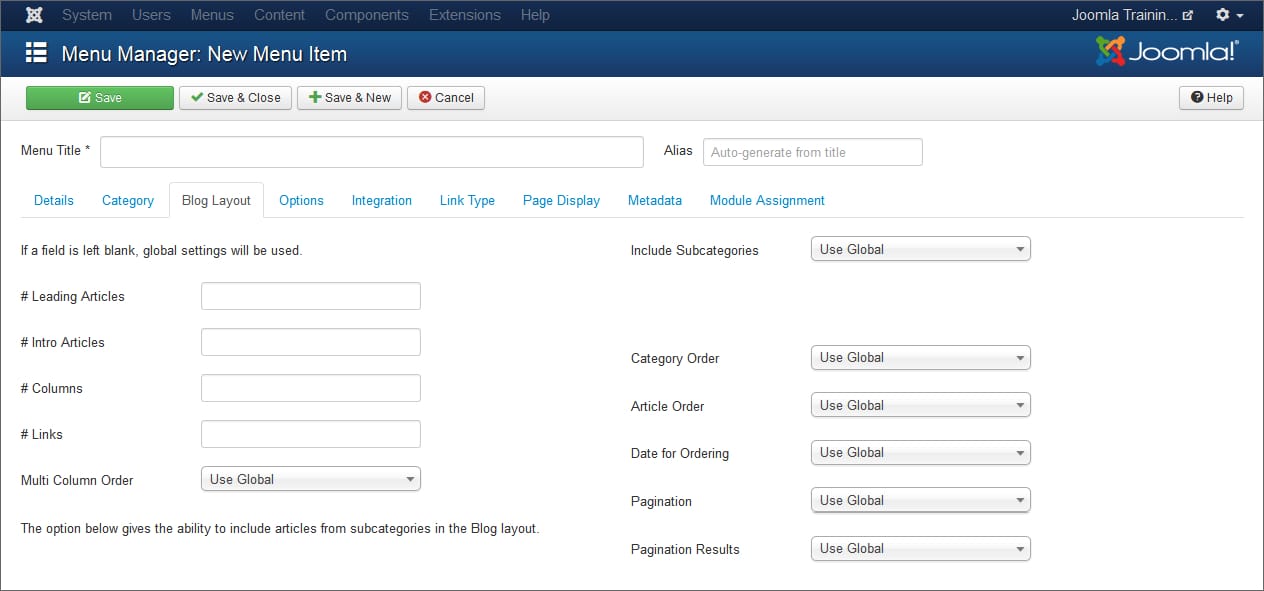
Left side of this panel you can do the following:
- Number of Leading Articles: These usually have a different styling such as spanning the full width of the page when viewed in the blog.
- Number of Intro Articles: These are the articles which are displayed beneath any leading articles and are laid out using the columns defined in the next option.
- Number of Columns: This is the number of columns into which the page is to be divided.
- Number of Links: The number of links to further articles to be shown below the intro articles. These are displayed as a list.
Note: Joomla websites are often designed with a global setting for options 2 to 5. If the fields are left empty, the global settings will be applied automatically by Joomla. Unless there is a specific need for an different layout arrangement, we would advise leaving these fields empty.
It is also recommended that the settings showing on the right side are left as the defaults unless a specific need requires them to be changed.
1.2 Featured Articles
Selecting 'Featured Articles' will close the dialogue and return you to the main editor window where the 'Menu Item Type' will be set to Featured Articles.
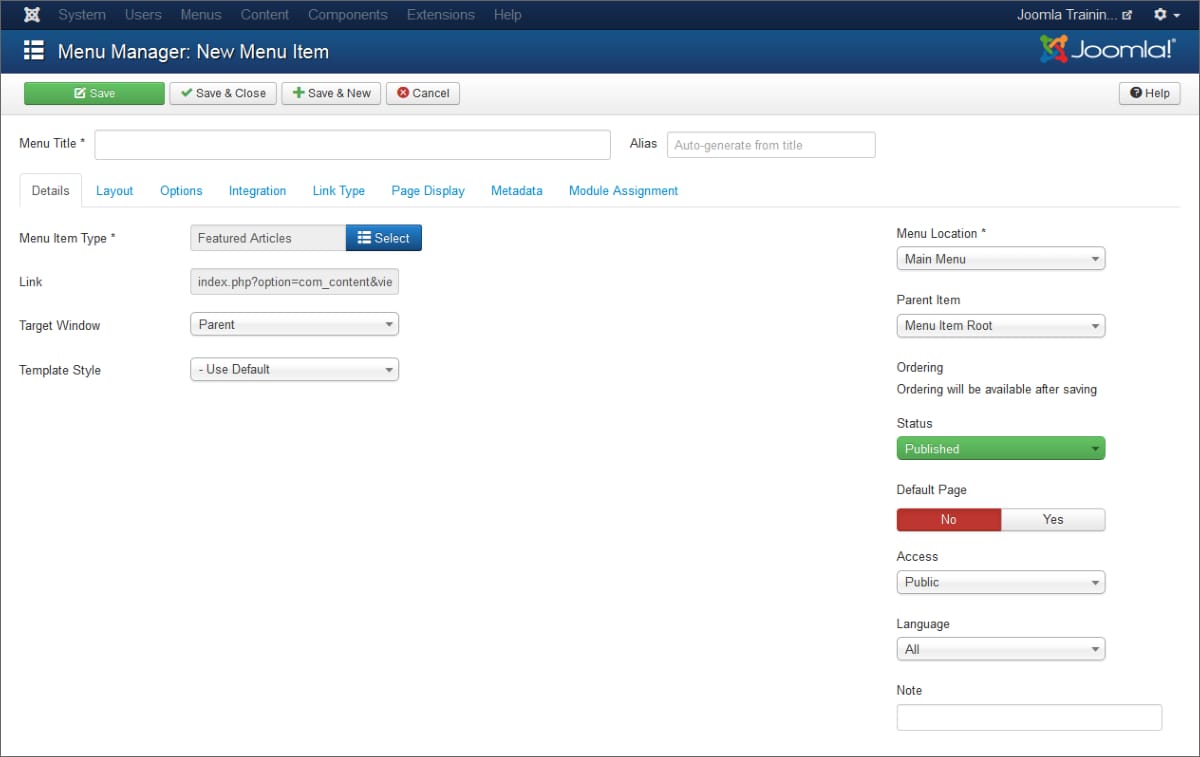
The option below will now read 'Link'.
Next access the layout tab as shown below.
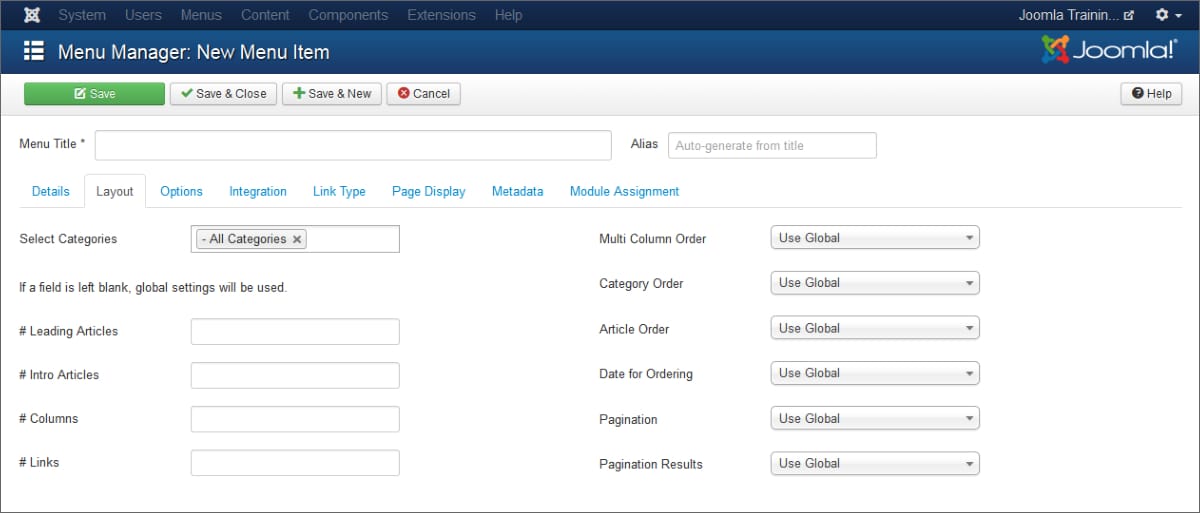
In this panel you can:
- Select Categories: Click in this space to choose categories to be added to this menu item display.
- Number of Leading Articles: These usually have a different styling such as spanning the full width of the page when viewed in the blog, or, having a different background colour.
- Number of Intro Articles: These are the articles which are displayed beneath any leading articles and are laid out using the columns defined in the next option, or, in the global configuration.
- Number of Columns: This is the number of columns into which the page is to be divided.
- Number of Links: The number of links to further articles to be shown below the intro articles. These are a simplye unordered list.
Note: Joomla websites are often designed with a global setting for options 2 to 5. If the fields are left empty, the global settings will be applied automatically by Joomla. Unless there is a specific need for an different layout arrangement, we would advise leaving these fields empty.
It is also recommended that the setttings showing on the right side are left as the defaults unless a specific need requires them to be changed.
When all the required options have been selected and fields completed, left click one of the article buttons:
- Save: Saves the new/ edited menu item but leaves the editor open. This enables checking of the menu item from the front end and modification without having to first open the editor again.
- Save & Close: Saves the new/ edited menu item, closes the editor and returns to the menu items list view.
- Save & New: Saves the new/ edited menu item, closes the item and opens the editor ready to begin adding a another menu item.
- Cancel: Cancels the new/ edited menu item, closes the editor and returns to the menu items list view. If an existing menu item was being edited, the changes are lost and the item retains it's existing settings.
2. Reordering Menu Items
It may be necessary to reorder the display of menu items after adding new or updating existing entries. Joomla v3 provides an easy drag and drop method for achieving this.
In the following image there is a close up view of the small icon made up of three square dots in a vertical line. These icons are the drag handles for the Joomla menu items.
![]()
Place the mouse cursor over the drag handle for the menu item to be moved to a new position. Left click and hold down the mouse button and move the mouse cursor in the direction the menu item is to be relocated. The menu item will move with the cursor and it's new position will show in blue as it moves.
When the menu item location is in the correct position, release the left mouse button to commit the change.
This process should be repeated for all affected Joomla menu items.
3. Deleting Menu Items
If a menu item needs to be deleted simply left-click the small white square to the left of the item in the list view to mark it. Multiple items can be marked by left-clicking the square beside each.
When all affected items have been marked, left-click the Trash button top of the screen. Joomla will prompt you to confirm the deletion after which the menu item will be removed.
Note: The multiple selections facility can also be used for changing the status of menu items or moving them to another menu if needed.
Return to Administrator Control Panel
When all required adding, editing, reordering and deleting of Joomla menu items has been completed, return to the main administrator control panel by left-clicking the icon top-left of Joomla.
![]()
This ends the tutorial: How to Edit Menus in Joomla 3