This tutorial will show you how to manage products within the Virtuemart v2 administration system on your Joomla website.
This tutorial assumes you have logged in to your main Joomla back-end Administrator system and accessed the Virtuemart Shop Control Panel.
Products are the items you make available for sale within your Virtuemart 2 shop.
Accessing the Product List
Access the product list either by clicking on the 'Products' icon, as shown in the image below or by clicking Products menu then Products option in the panel to the left of the main area.
![]()
You will then be presented with the list of current products within your shop as shown in the image below.
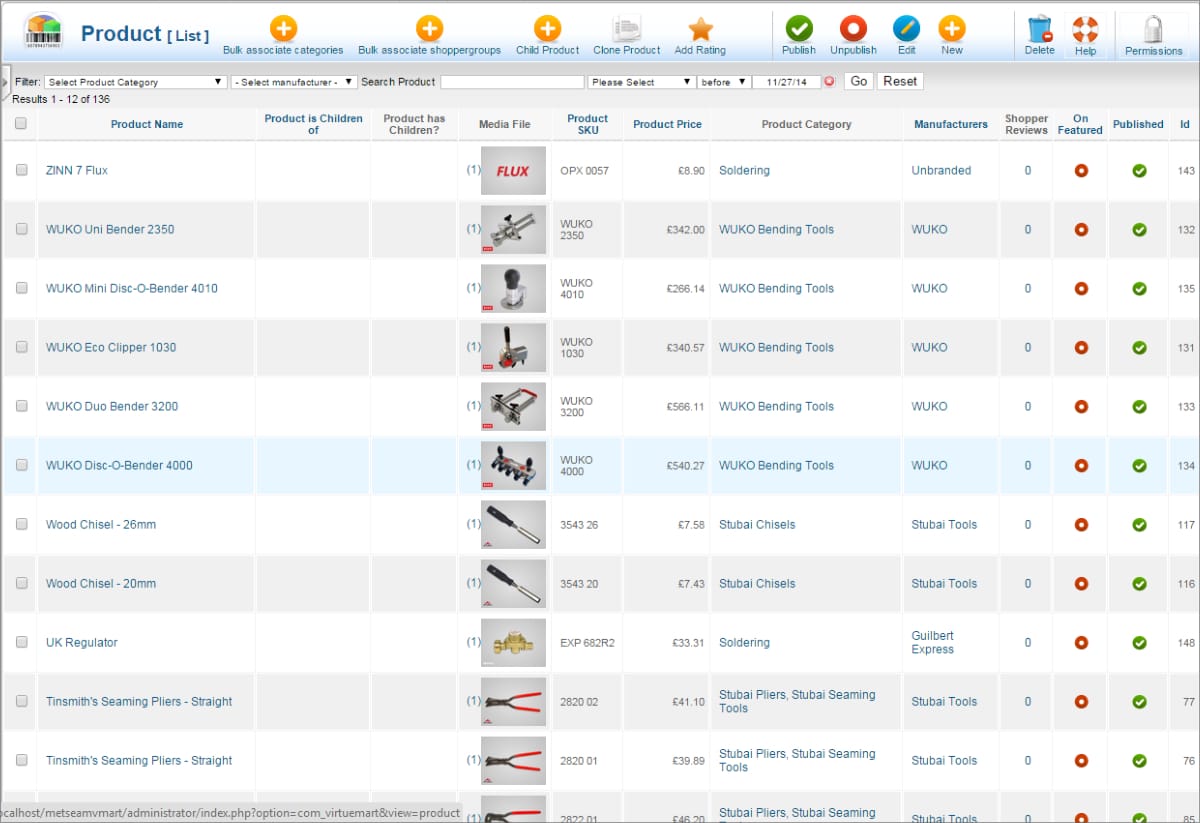
The product list is structured, from left to right, as follows:
- Above the main list is a filter which can be used to display only those products from specific categories, or, which match keywords entered by you. This can be useful in a shop with a long list of products.
- Checkboxes: These are used to select one or more products to action using options in the menu located above the list. The menu is explained in more detail below.
- The product name
- A marker showing if the product is a child of another product.
- The number of child products related to this product.
- Media File: The primary image associated with the product.
- Product SKU: This is a location where you can enter a product reference code, perhaps for loacting products within your stock room, or, an internal reference.
- Product Price: The selling price of the product.
- Product category: The category or categories to which the product has been linked.
- Manufacturer: The manufacturer of the product.
- Shopper Reviews: The numbers of reviews the product has received.
- On Featured: If enabled the product will be displayed in the Featured panel of your shop home page.
- Published. This indicates if the product is published, a tick, or unpublished, a red X. Clicking on the icon toggles the category between these two states.
- ID: This is an internal reference used by Virtuemart.
Above the main list is a menu of options as follows:
- Bulk Associate Product: This enables all products whose checkboxes have been ticked to be linked to a category in one process.
- Bulk Associate Shopper Groups: This enables all products whose checkboxes have been ticked to be linked to a customer group in one process.
- Child Product: Create a child product based on the select existing product. This is ideal for creating options such as colours for a tee shirt.
- Clone Product: Make a copy of the selected product.
- Add Rating: Add a rating for the product. This will appear as one to five stars on the product details page.
- Publish: Publish the selected product(s).
- Unpublish: Unpublish the selected product(s)
- Edit: Edit the selected product.
- New: Add a new product to the shop.
- Delete: Delete the selected product(s).
- Help: Context help for this section of the shop administration.
- Permissions
By selecting checkboxes next to one or more categories it is possible to use many of the menu options to modify a number of products at the same time.
Add a New Product
Click the New option to begin adding a new product to your shop. The following dialogue will be displayed.
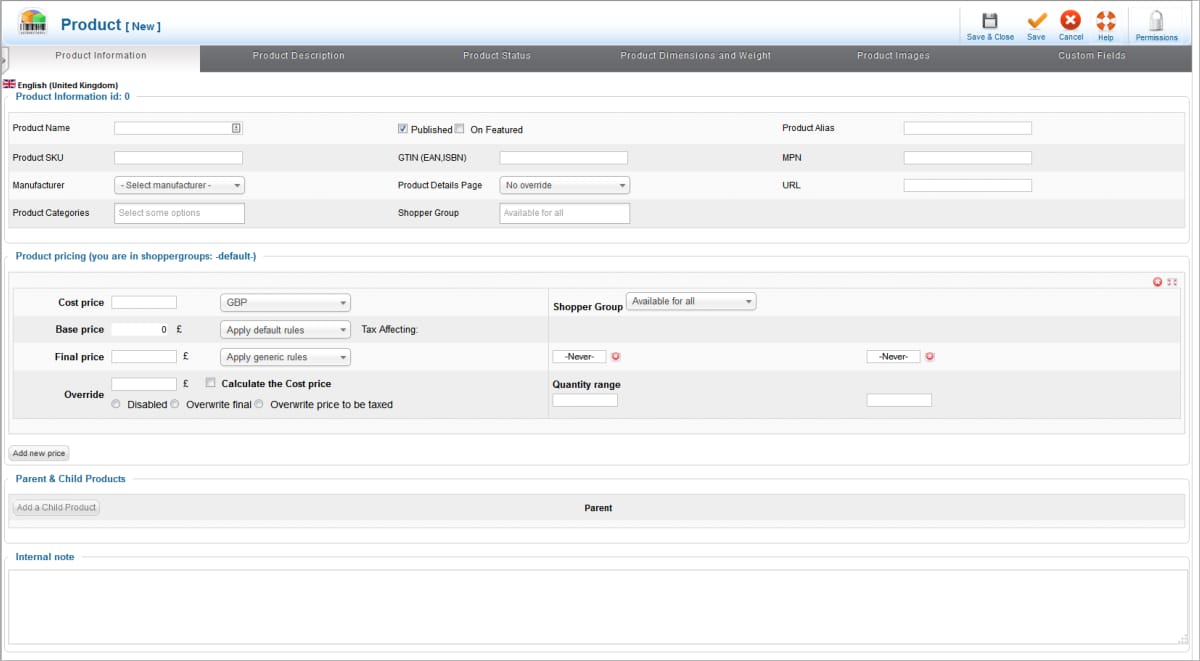
The dialogue consists of six different panels, five of which are covered in this tutorial:
- Product Information: The core information about the product.
- Product Description: The description of the product to assist customers.
- Product Status: Stock levels, availability and facility to email customer list about a new product to promote it, however, be careful not to send too many or this could be viewed as spamming.
- Product Dimensions and Weight: The physical information about the product.
- Product Images: Images of the product.
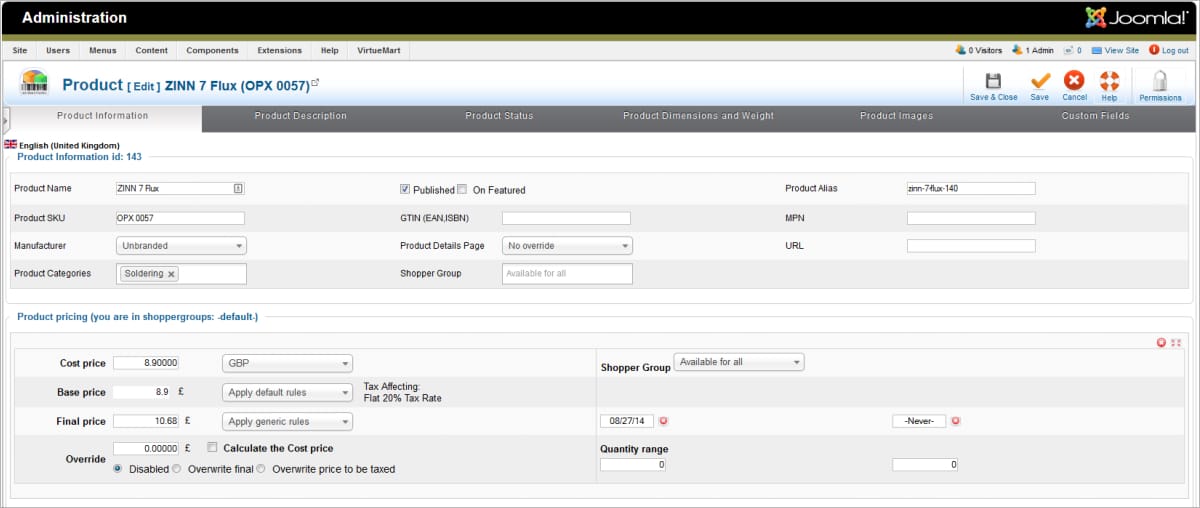
Note: If you select an existing product from the list and open it for editing, the same dialogue of panels will be displayed, however, they will be populated with the existing information for the product. See example below:
The following is the key information needed on each panel to add a new product.
Product Information
Within the product information panel you will need to enter the following details as a minimum:
- Product Name
- Product SKU
- Manufacturer: select from the available list.
- Product Categories: Select at least one category for your product.
- Published: Ensure this is checked or your product will not be displayed in the shop.
- Shopper Group: Leave empty (available for all) unless you are restricting it to a specific group.
- Product Alias: Automatically completed on saving the product.
- Select your main currency from the drop-down list.
- Final Price: Enter the selling price of your product, check the Calculate Cost Price option and when you save, Virtuemart will calculate cost and base price for you. You can override these figures at any time.
Product Description
- Short Description: Enter a concise no more than ten words paragraph.
- Product Description: Enter all the remaining information for your product.
- Custom Page Title: Enter a descriptive product title or leave blank to use the product name.
- Meta Keywords: Leave empty
- Meta Description: Enter a keyword rich description for search engines to index.
- Meta Robots: leave at default
- Author: Enter your name or leave blank.
Product Status
This section is important if you want to manage the stock levels through Virtuemart. If yes:
- In Stock: the number of the product in stock.
- Booked, ordered products: The number on order from your supplier.
- Low Stock Notification: The number of products at which you want to be notified that a reorder is necessary.
- Minimum purchase quantity. Enter a minimum number that customers will have to buy or leave blank to use the shop defaults.
- Maximum purchase quantity: The maximum number of the product a customer can buy in one transaction.
Product Dimensions and Weight
This section is important if you calculate postage based on the weight of products in the order, or, on the dimensions of the products within the order.
Product Images
These are the images you want to display for the product in the category listing and in the product details.
You can search for existing images within the shop, or, use the Upload facility to add new images to your website from another source.
There is a small menu of options above the main dialogue containing the following options:
- Save & Close: Use this option when you have finished editing a new product, or, updating an existing product and want to return to the main product list.
- Save: Use this option while editing to check changes but keep the dialogue open for further changes.
- Cancel: Discard any changes made since the last save and return to the main product list.
- Help: Context help for the Product dialogue.
- Permissions.
Return to Virtuemart Shop Control Panel
You can return to the Virtuemart Shop Control Panel at any time by left-clicking the Virtuemart badge shown top of the left menu as in the image below.

Return to Joomla Administrator Control Panel
You can return to the main administrator control panel by left-clicking the white icon displayed top left of the Joomla window.
![]()
This concludes the tutorial: Understand Products in Virtuemart 2.