This tutorial will show you how to manage categories within the Virtuemart v2 administration system on your Joomla website.
This tutorial assumes you have logged in to your main Joomla back-end Administrator system and accessed the Virtuemart Shop Control Panel.
Categories are the way in which you can structure your products to make it easier for customers to find what they want.
Accessing the Category Screen
Access the category screen either by clicking on the 'Product Categories' icon, as shown in the image below, or, by clicking Products then Product Categories in the panel to the left of the main panel.
![]()
You will then be presented with the list of current categories within your shop as shown in the image below.
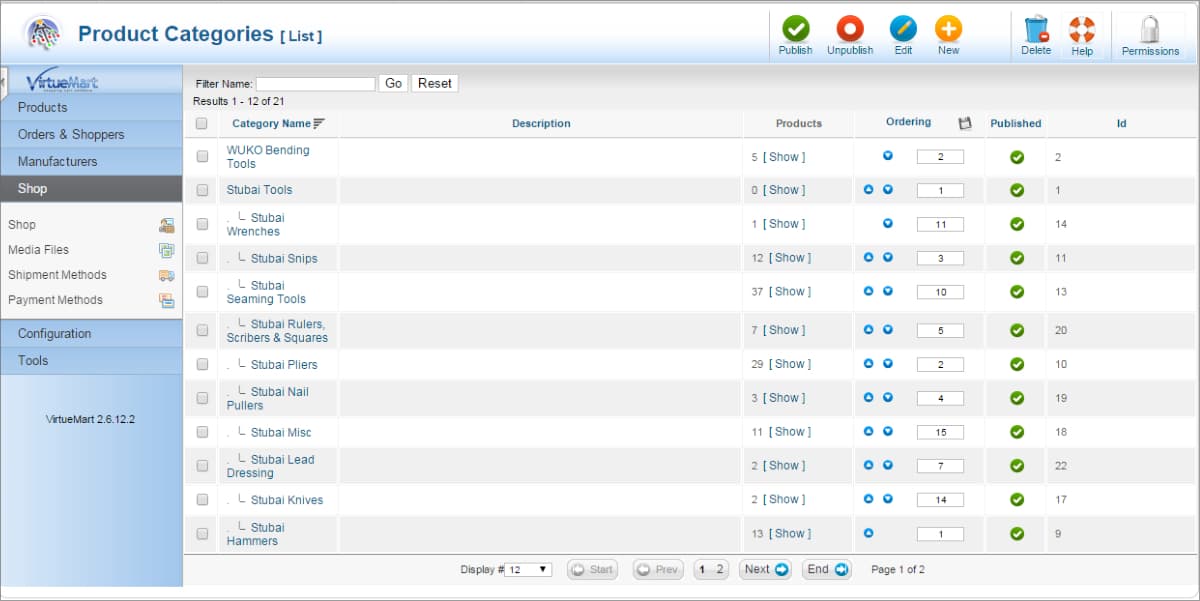
The category list is structured, from left to right, as follows:
- Above the main list is a filter which can be used to display only those categories which match keywords entered by you. This can be useful in a shop with a long list of categories.
- Checkboxes: These are used to select one or more categories to action using options in the menu top right of the panel. The menu is explained in more detail below.
- The category name
- Category description if entered.
- Number of products within the category. Clicking the show option will display the list of products within the category.
- Ordering. This provides a way to change the order of categories which then affects how they are displayed within the shop to customers.
- Published. This indicates if the category is published, a tick, or unpublished, a red 'X'. Clicking on the icon toggles the category between these two states.
- ID: This is an internal reference used by Virtuemart.
Above the main list is a menu of options as shown in the following image:
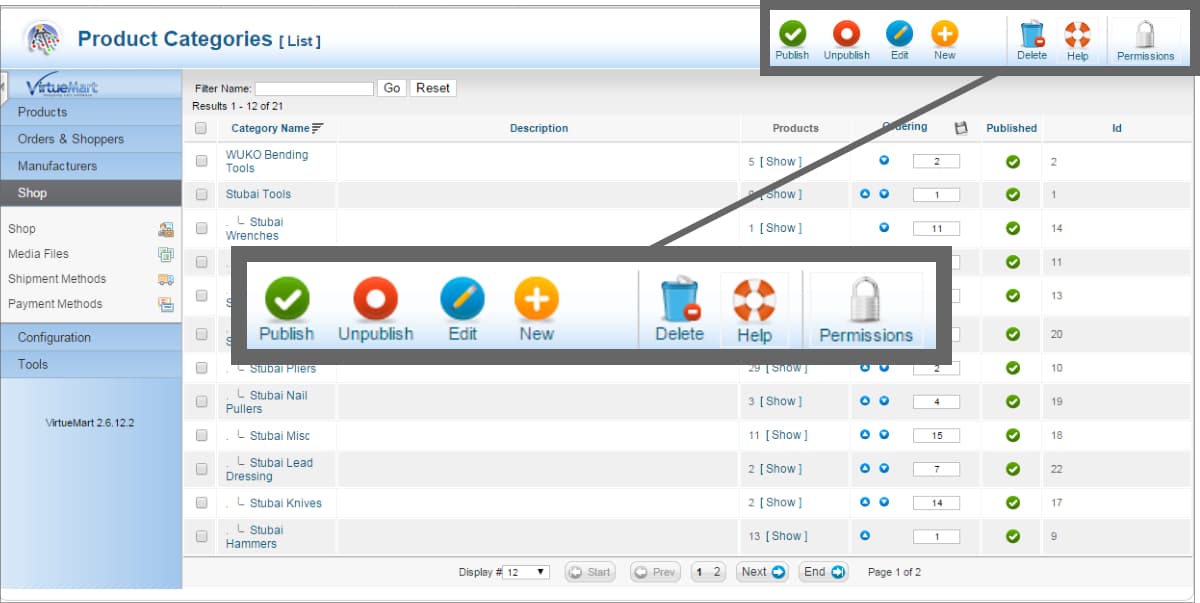
The options in this menu are:
- Publish: Used to change the selected category's state to published.
- Unpublish: Used to change the selected category's state to unpublished.
- Edit: Open an existing category for editing.
- New: Open the dialogue to add a new category to the shop.
- Delete: Delete the selected category.
- Help: Context help for the category system.
- Permissions
By selecting checkboxes next to one or more categories it is possible to use the Publish, Unpublish and Delete options to modify a number of categories at the same time.
1. Add a New Category
Click the New option to begin adding a new category to your shop. The following dialogue will be displayed.
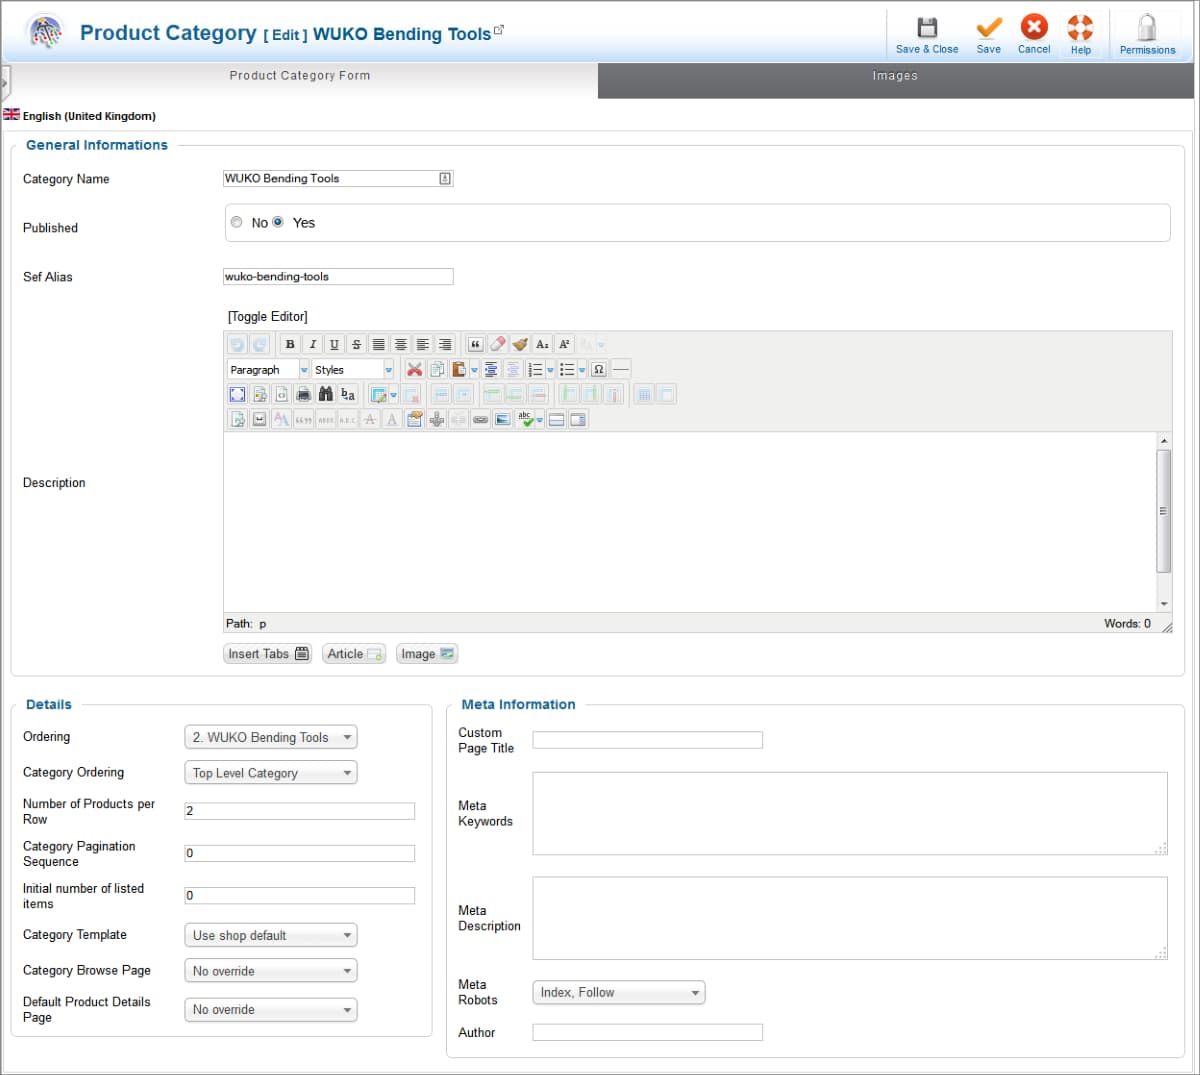
Note: If you check an existing category and select Edit instead, this same window will open but will be populated with the current details of the category. See image below for an example.
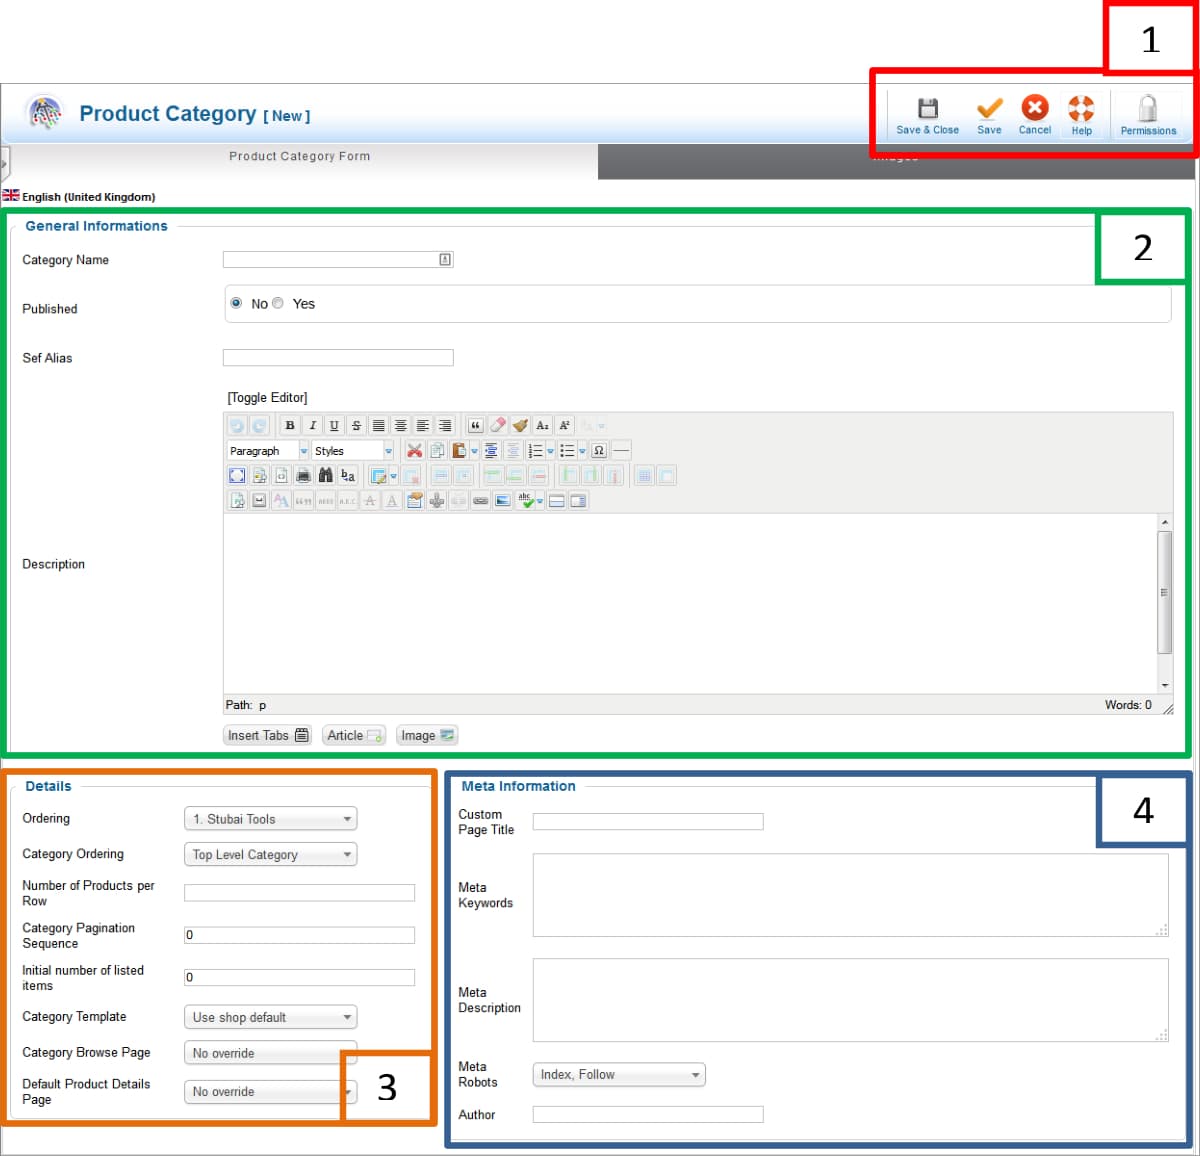
The New Category dialogue has two panels:
- Product Category Form, shown above
- Images
1.1 Product Category Form
The product category form has four main sections.
1) Menu
The menu includes the following options:
- Save & Close: This is used when all editing has been completed to save the current settings, close the dialogue and return to the main category list.
- Save: This is used while editing to save the current changes but keep the dialogue open. This enables checking of the changes and continued editing if needed.
- Cancel: Discard any changes since the last save, close the dialogue window and return to the main category list.
- Help: Context help for the New/ Edit window.
- Permissions
2) General Information
This holds the main details of the category and should be completed as follows:
- Category Name: Give your category a distinctive name which is good for customers searching for a type of product. This will also be good for search engines.
- Published. If you want your category to be displayed in the shop set this to 'Yes'.
- Sef (Search Engine Friendly) Alias: This will auto complete after you save for the first time.
- Description: Enter a description for your category here if needed.
3) Details
The details panel determines how the category should appear within the shop and should be completed as follows:
- Ordering: Ordering is best handled using the options in the main list.
- Category Ordering: Is this a top level category or is it a sub-category within another category. If the second option, use this to select the parent category.
- Number of Products per Row: How many products will appear together in a row. You will be advised how many to enter here based on the design of your specific shop.
- Category Pagination Sequence: You can override the global setting for number of products to be displayed per page within this category. Leave at '0' to use the defaults.
- Initial Number of Listed Items: This is the number of items which should be displayed when the customer accesses the category. You can override the global setting for number of products to be displayed per page within this category. Leave at '0' to use the defaults.
- Category template: Leave as shop default unless advised differently.
- Category Browse: Leave as 'no override' unless advised differently.
- Default Product Details Page: Leave as 'no override' unless advised differently.
4) Meta Information
This is specific to preparing the category for search engine indexing and should be completed as follows:
- Custom Page Title: Enter a more detailed title for your category or leave blank to use the Category Name entered under General Information.
- Meta Keywords: Leave blank as search engines place no importance on this aspect.
- Meta Description: Enter a keyword rich text describing your category.
- Meta Robots: Leave as Index, Follow. You want the search engines to index all your product pages for maximum search performance.
- Author: You can enter your name or leave blank.
1.2 Images
This panel is used to select an image which best represents your category.
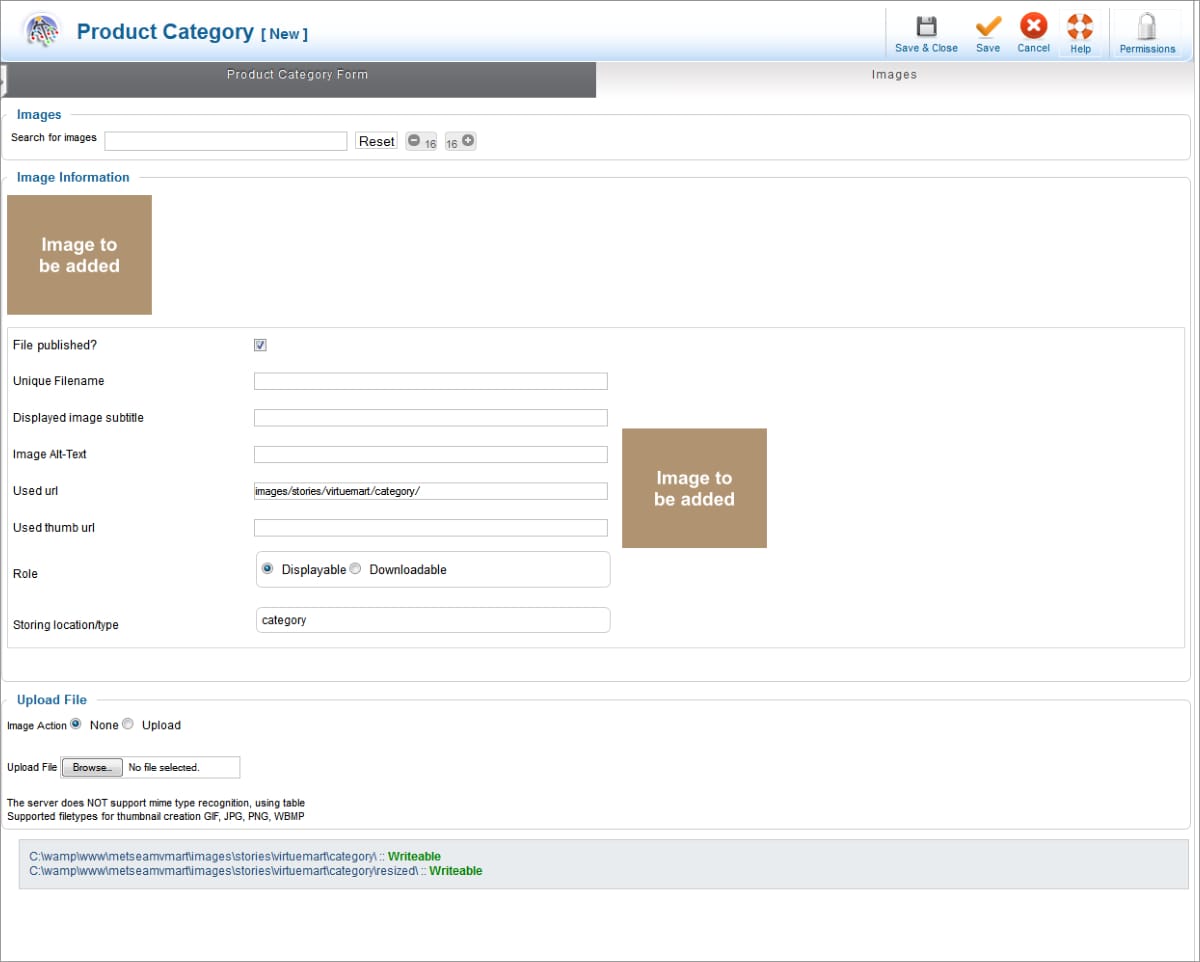
There are two main ways you can add an image to the category:
- You can use the search for an existing image on your website using the Search for Images option top of the page. When a list of images is displayed, select the one you want to use.
- Upload File: Located at the bottom of the screen, this enables you to select a file from your local computer which will then be copied to your website and linked to the category. You will be advised regarding the dimensions of images to be used for categories.
When you have completed both panels you can:
- Click the Save option, check how your new category looks in the shop and continue making changes until you are finished.
- Click the Save and Close option when you have finished editing and want to return to the main category list.
Return to Virtuemart Shop Control Panel
You can return to the Virtuemart Shop Control Panel at any time by left-clicking the Virtuemart badge shown top of the left menu as in the image below.

Return to Joomla Administrator Control Panel
You can return to the main administrator control panel by left-clicking the white icon displayed top left of the Joomla window.
![]()
This concludes the tutorial: Managing Categories in Virtuemart 2